
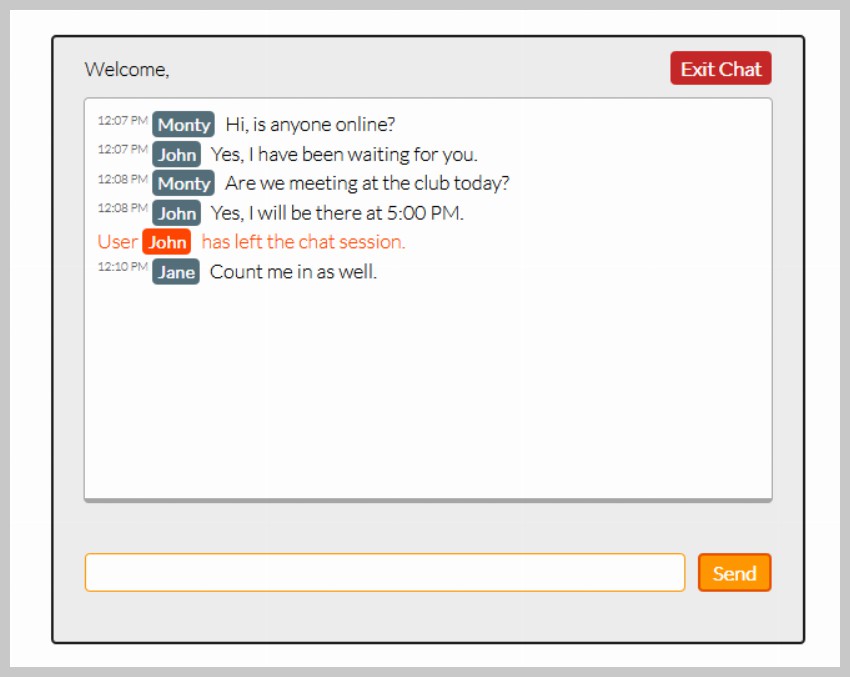
In this tutorial, we will be creating a simple web-based chat application with PHP and jQuery. This sort of utility would be perfect for a live support system for your website.
This tutorial was updated recently to make improvements in the chat app.
Introduction
Step 1: HTML Markup
We will start this tutorial by creating our first file, called index.php.
01 02 03 04 05 06 07 08 09 10 11 12 13 14 15 16 17 18 19 20 21 22 23 24 25 26 27 28 29 30 | <!DOCTYPE html><html lang="en"> <head> <meta charset="utf-8" /> <title>Tuts+ Chat Application</title> <meta name="description" content="Tuts+ Chat Application" /> <link rel="stylesheet" href="style.css" /> </head> <body> <div id="wrapper"> <div id="menu"> <p class="welcome">Welcome, <b></b></p> <p class="logout"><a id="exit" href="#">Exit Chat</a></p> </div> <div id="chatbox"></div> <form name="message" action=""> <input name="usermsg" type="text" id="usermsg" /> <input name="submitmsg" type="submit" id="submitmsg" value="Send" /> </form> </div> <script type="text/javascript" src="https://cdnjs.cloudflare.com/ajax/libs/jquery/3.5.1/jquery.min.js"></script> <script type="text/javascript"> // jQuery Document $(document).ready(function () {}); </script> </body></html> |
- We start our HTML with the usual DOCTYPE, html, head, and body tags. In the head tag, we add our title and link to our CSS stylesheet (style.css).
- Inside the body tag, we structure our layout inside the
#wrapperdiv. We will have three main blocks: a simple menu, our chatbox, and our message input, each with its respective div and id.- The
#menudiv will consist of two paragraph elements. The first will be a welcome to the user and will be on the left, and the second will be an exit link and will be on the right. We are using flexbox instead of floating elements for the layout. - The
#chatboxdiv will contain our chatlog. We will load our log from an external file using jQuery'sajaxrequest. - The last item in our
#wrapperdiv will be our form, which will include a text input for the user message and a submit button.
- The
- We add our scripts last so that the page will load faster. We will first link to the Cloudflare jQuery CDN, as we will be using the jQuery library for this tutorial. Our second script tag is what we will be working on. We will load all of our code after the document is ready.
Step 2: CSS Styling
We will now add some CSS to make our chat application look better than with the default browser styling. The code below will be added to our style.css file.
001 002 003 004 005 006 007 008 009 010 011 012 013 014 015 016 017 018 019 020 021 022 023 024 025 026 027 028 029 030 031 032 033 034 035 036 037 038 039 040 041 042 043 044 045 046 047 048 049 050 051 052 053 054 055 056 057 058 059 060 061 062 063 064 065 066 067 068 069 070 071 072 073 074 075 076 077 078 079 080 081 082 083 084 085 086 087 088 089 090 091 092 093 094 095 096 097 098 099 100 101 102 103 104 105 106 107 108 109 110 111 112 113 114 115 116 117 118 119 120 121 122 123 124 125 126 127 128 129 130 131 132 133 134 135 136 137 138 139 140 141 142 | * { margin: 0; padding: 0; } body { margin: 20px auto; font-family: "Lato"; font-weight: 300; } form { padding: 15px 25px; display: flex; gap: 10px; justify-content: center; } form label { font-size: 1.5rem; font-weight: bold; } input { font-family: "Lato"; } a { color: #0000ff; text-decoration: none; } a:hover { text-decoration: underline; } #wrapper, #loginform { margin: 0 auto; padding-bottom: 25px; background: #eee; width: 600px; max-width: 100%; border: 2px solid #212121; border-radius: 4px; } #loginform { padding-top: 18px; text-align: center; } #loginform p { padding: 15px 25px; font-size: 1.4rem; font-weight: bold; } #chatbox { text-align: left; margin: 0 auto; margin-bottom: 25px; padding: 10px; background: #fff; height: 300px; width: 530px; border: 1px solid #a7a7a7; overflow: auto; border-radius: 4px; border-bottom: 4px solid #a7a7a7; } #usermsg { flex: 1; border-radius: 4px; border: 1px solid #ff9800; } #name { border-radius: 4px; border: 1px solid #ff9800; padding: 2px 8px; } #submitmsg, #enter{ background: #ff9800; border: 2px solid #e65100; color: white; padding: 4px 10px; font-weight: bold; border-radius: 4px; } .error { color: #ff0000; } #menu { padding: 15px 25px; display: flex; } #menu p.welcome { flex: 1; } a#exit { color: white; background: #c62828; padding: 4px 8px; border-radius: 4px; font-weight: bold; } .msgln { margin: 0 0 5px 0; } .msgln span.left-info { color: orangered; } .msgln span.chat-time { color: #666; font-size: 60%; vertical-align: super; } .msgln b.user-name, .msgln b.user-name-left { font-weight: bold; background: #546e7a; color: white; padding: 2px 4px; font-size: 90%; border-radius: 4px; margin: 0 5px 0 0; } .msgln b.user-name-left { background: orangered; } |
There's nothing special about the above CSS other than the fact that some ids or classes, which we have set a style for, will be added a bit later.

Step 3: Using PHP to Create a Login Form
Now we will implement a simple form that will ask the user their name before continuing further.
01 02 03 04 05 06 07 08 09 10 11 12 13 14 15 16 17 18 19 20 21 22 23 24 25 | <?phpsession_start();if(isset($_POST['enter'])){ if($_POST['name'] != ""){ $_SESSION['name'] = stripslashes(htmlspecialchars($_POST['name'])); } else{ echo '<span class="error">Please type in a name</span>'; }}function loginForm(){ echo' <div id="loginform"> <p>Please enter your name to continue!</p> <form action="index.php" method="post"> <label for="name">Name —</label> <input type="text" name="name" id="name" /> <input type="submit" name="enter" id="enter" value="Enter" /> </form> </div> ';}?> |
The loginForm() function we created is composed of a
simple login form which asks the user for their name. We then use an if
and else statement to verify that the person entered a name. If the
person entered a name, we set that name as $_SESSION['name']. Since we are using a cookie-based session to store the name, we must call session_start() before anything is outputted to the browser.
One thing that you may want to pay close attention to is that we have used the htmlspecialchars() function, which converts special characters to HTML entities, therefore protecting the name variable from falling victim to cross-site scripting (XSS). Later, we will also add this function to the text variable that will be posted to the chat log.
Showing the Login Form
In order to show the login form in case a user has not logged in, and
hence has not created a session, we use another if and else statement
around the #wrapper div and script tags in our original
code. In the opposite case, this will hide the login form and show the
chat box if the user is logged in and has created a session.
01 02 03 04 05 06 07 08 09 10 11 12 13 14 15 16 17 18 19 20 21 22 23 24 25 26 27 28 29 30 31 32 33 34 35 36 | <?phpif(!isset($_SESSION['name'])){ loginForm();}else{?><div id="wrapper"> <div id="menu"> <p class="welcome">Welcome, <b><?php echo $_SESSION['name']; ?></b></p> <p class="logout"><a id="exit" href="#">Exit Chat</a></p> </div> <div id="chatbox"> <?php if(file_exists("log.html") && filesize("log.html") > 0){ $contents = file_get_contents("log.html"); echo $contents; } ?> </div> <form name="message" action=""> <input name="usermsg" type="text" id="usermsg" /> <input name="submitmsg" type="submit" id="submitmsg" value="Send" /> </form></div><script type="text/javascript" src="https://cdnjs.cloudflare.com/ajax/libs/jquery/3.5.1/jquery.min.js"></script><script type="text/javascript">// jQuery Document$(document).ready(function(){});</script><?php}?> |

Welcome and Logout Menu
We are not yet finished creating the login system for this chat application. We still need to allow the user to log out and end the chat session. If you remember, our original HTML markup included a simple menu. Let's go back and add some PHP code that will give the menu more functionality.
First of all, let's add the user's name to the welcome message. We do this by outputting the session of the user's name.
1 | <p class="welcome">Welcome, <b><?php echo $_SESSION['name']; ?></b></p> |

In order to allow the user to log out and end the session, we will jump ahead of ourselves and briefly use jQuery.
01 02 03 04 05 06 07 08 09 10 | <script type="text/javascript">// jQuery Document$(document).ready(function(){ //If user wants to end session $("#exit").click(function(){ var exit = confirm("Are you sure you want to end the session?"); if(exit==true){window.location = 'index.php?logout=true';} });});</script> |
The jQuery code above simply shows a confirmation alert if a user clicks the #exit link. If the user confirms the exit, therefore deciding to end the session, then we send them to index.php?logout=true. This simply creates a variable called logout with the value of true. We need to catch this variable with PHP:

1 2 3 4 5 6 7 8 9 | if(isset($_GET['logout'])){ //Simple exit message $logout_message = "<div class='msgln'><span class='left-info'>User <b class='user-name-left'>". $_SESSION['name'] ."</b> has left the chat session.</span><br></div>"; file_put_contents("log.html", $logout_message, FILE_APPEND | LOCK_EX); session_destroy(); header("Location: index.php"); //Redirect the user} |
We now see if a get variable of 'logout' exists using the isset()
function. If the variable has been passed via a URL, such as the link
mentioned above, we proceed to end the session of the user's name.
Before destroying the user's name session with the session_destroy() function,
we want to write a simple exit message to the chat log. It will say
that the user has left the chat session. We do this by using the file_put_contents() function to manipulate our log.html file, which, as we will see later on, will be created as our chat log. The file_put_contents() function is a convenient way to write data to a text file instead of using fopen(), fwrite(), and fclose() each time. Just make sure that you pass appropriate flags like FILE_APPEND to append the data at the end of the file. Otherwise, a new $logout_message will overwrite the previous content of the file. Please note that we have added a class of msgln to the div. We have already defined the CSS styling for this div.
After doing this, we destroy the session and redirect the user to the same page where the login form will appear.
Step 4: Handling User Input
After a user submits our form, we want to grab their input and write it to our chat log. In order to do this, we must use jQuery and PHP to work synchronously on the client and server sides.
jQuery
Almost everything we are going to do with jQuery to handle our data will revolve around the jQuery post request.
1 2 3 4 5 6 7 | //If user submits the form$("#submitmsg").click(function () { var clientmsg = $("#usermsg").val(); $.post("post.php", { text: clientmsg }); $("#usermsg").val(""); return false;}); |
- Before we do anything, we must grab the user's input, or what the user has typed into the
#submitmsginput. This can be achieved with theval()function, which gets the value set in a form field. We now store this value in theclientmsgvariable. - Here comes our most important part: the jQuery post request. This sends a POST request to the post.php file that we will create in a moment. It posts the client's input, or what has been saved into the
clientmsgvariable. - Lastly, we clear the
#usermsginput by setting the value attribute to blank.
Please note that the code above will go into our script tag, where we placed the jQuery logout code.
PHP: The post.php File
At the moment, we have POST data being sent to the post.php file each time the user submits the form and sends a new message. Our goal now is to grab this data and write it into our chat log.
01 02 03 04 05 06 07 08 09 10 | <?session_start();if(isset($_SESSION['name'])){ $text = $_POST['text']; $text_message = "<div class='msgln'><span class='chat-time'>".date("g:i A")."</span> <b class='user-name'>".$_SESSION['name']."</b> ".stripslashes(htmlspecialchars($text))."<br></div>"; file_put_contents("log.html", $text_message, FILE_APPEND | LOCK_EX);}?> |
Before we do anything, we have to start the post.php file with the session_start() function as we will be using the session of the user's name in this file.
Using the isset boolean, we check if the session for
'name' exists before doing anything else. We now grab the POST data that
was being sent to this file by jQuery. We store this data into the $text variable. This data, like all the overall user input data, will be stored in the log.html file. We simply use the file_put_contents() function to write all the data to the file.
The message we will be writing will be enclosed inside the .msgln div. It will contain the date and time generated by the date() function, the session of the user's name, and the text, which is also surrounded by the htmlspecialchars() function to prevent XSS.
Step 5: Displaying the Chat Log Contents
Everything the user has posted is handled and posted using jQuery; it is written to the chat log with PHP. The only thing left to do is to display the updated chat log to the user with log.php.
In order to save ourselves some time, we will preload the chat log into the #chatbox div if it has any content.
1 2 3 4 5 6 7 | <div id="chatbox"><?phpif(file_exists("log.html") && filesize("log.html") > 0){ $contents = file_get_contents("log.html"); echo $contents;}?></div> |
We use a similar routine as we used in the post.php file, except this time we are only reading and outputting the contents of the file.
The jQuery.ajax Request
The AJAX request is the core of everything we are doing. This request not only allows us to send and receive data through the form without refreshing the page, but it also allows us to handle the data requested.
01 02 03 04 05 06 07 08 09 10 | //Load the file containing the chat logfunction loadLog(){ $.ajax({ url: "log.html", cache: false, success: function(html){ $("#chatbox").html(html); //Insert chat log into the #chatbox div }, });} |
We wrap our AJAX request inside a function. You will see why in a second. As you see above, we will only use three of the jQuery AJAX request objects.
-
url: A string of the URL to request. We will use our chat log's filename of log.html. -
cache: This will prevent our file from being cached. It will ensure that we get an updated chat log every time we send a request. -
success: This will allow us to attach a function that will pass the data we requested.
As you see, we then move the HTML data we requested into the #chatbox div.
Auto-Scrolling
As you may have seen in other chat applications, the content automatically scrolls down if the chat log container (#chatbox)
overflows. We are going to implement a simple and similar feature,
which will compare the container's scroll height before and after we do
the AJAX request. If the scroll height is greater after the request, we
will use jQuery's animate effect to scroll the #chatbox div.
01 02 03 04 05 06 07 08 09 10 11 12 13 14 15 16 17 | //Load the file containing the chat logfunction loadLog(){ var oldscrollHeight = $("#chatbox")[0].scrollHeight - 20; //Scroll height before the request $.ajax({ url: "log.html", cache: false, success: function(html){ $("#chatbox").html(html); //Insert chat log into the #chatbox div //Auto-scroll var newscrollHeight = $("#chatbox")[0].scrollHeight - 20; //Scroll height after the request if(newscrollHeight > oldscrollHeight){ $("#chatbox").animate({ scrollTop: newscrollHeight }, 'normal'); //Autoscroll to bottom of div } }, });} |
We first store the #chatbox div's scroll height into the oldscrollHeight variable before we make the request. After our request has returned successfully, we store the #chatbox div's scrolled height into the newscrollHeight variable.
We then compare both of the scroll height variables using an if statement. If newscrollHeight is greater than the oldscrollHeight, we use the animate effect to scroll the #chatbox div.
Continuously Updating the Chat Log
Now one question may arise: how will we constantly update the new data being sent back and forth between users? Or to rephrase the question, how will we keep continuously sending requests to update the data?
1 | setInterval (loadLog, 2500); //Reload file every 2500 ms or x ms if you wish to change the second parameter |
The answer to our question lies in the setInterval function. This function will run our loadLog() function every 2.5 seconds, and the loadLog function will request the updated file and autoscroll the div.

Complete Code
The chat app might not work properly for you if the right code is not placed inside the right files and in the right order. To avoid any confusion, I am posting the whole code that will go into two separate files called index.php and post.php.
Here is the code for index.php:
001 002 003 004 005 006 007 008 009 010 011 012 013 014 015 016 017 018 019 020 021 022 023 024 025 026 027 028 029 030 031 032 033 034 035 036 037 038 039 040 041 042 043 044 045 046 047 048 049 050 051 052 053 054 055 056 057 058 059 060 061 062 063 064 065 066 067 068 069 070 071 072 073 074 075 076 077 078 079 080 081 082 083 084 085 086 087 088 089 090 091 092 093 094 095 096 097 098 099 100 101 102 103 104 105 106 107 108 109 110 111 112 113 114 115 116 117 | <?phpsession_start();if(isset($_GET['logout'])){ //Simple exit message $logout_message = "<div class='msgln'><span class='left-info'>User <b class='user-name-left'>". $_SESSION['name'] ."</b> has left the chat session.</span><br></div>"; file_put_contents("log.html", $logout_message, FILE_APPEND | LOCK_EX); session_destroy(); header("Location: index.php"); //Redirect the user}if(isset($_POST['enter'])){ if($_POST['name'] != ""){ $_SESSION['name'] = stripslashes(htmlspecialchars($_POST['name'])); } else{ echo '<span class="error">Please type in a name</span>'; }}function loginForm(){ echo '<div id="loginform"> <p>Please enter your name to continue!</p> <form action="index.php" method="post"> <label for="name">Name —</label> <input type="text" name="name" id="name" /> <input type="submit" name="enter" id="enter" value="Enter" /> </form> </div>';}?><!DOCTYPE html><html lang="en"> <head> <meta charset="utf-8" /> <title>Tuts+ Chat Application</title> <meta name="description" content="Tuts+ Chat Application" /> <link rel="stylesheet" href="style.css" /> </head> <body> <?php if(!isset($_SESSION['name'])){ loginForm(); } else { ?> <div id="wrapper"> <div id="menu"> <p class="welcome">Welcome, <b><?php echo $_SESSION['name']; ?></b></p> <p class="logout"><a id="exit" href="#">Exit Chat</a></p> </div> <div id="chatbox"> <?php if(file_exists("log.html") && filesize("log.html") > 0){ $contents = file_get_contents("log.html"); echo $contents; } ?> </div> <form name="message" action=""> <input name="usermsg" type="text" id="usermsg" /> <input name="submitmsg" type="submit" id="submitmsg" value="Send" /> </form> </div> <script type="text/javascript" src="https://cdnjs.cloudflare.com/ajax/libs/jquery/3.5.1/jquery.min.js"></script> <script type="text/javascript"> // jQuery Document $(document).ready(function () { $("#submitmsg").click(function () { var clientmsg = $("#usermsg").val(); $.post("post.php", { text: clientmsg }); $("#usermsg").val(""); return false; }); function loadLog() { var oldscrollHeight = $("#chatbox")[0].scrollHeight - 20; //Scroll height before the request $.ajax({ url: "log.html", cache: false, success: function (html) { $("#chatbox").html(html); //Insert chat log into the #chatbox div //Auto-scroll var newscrollHeight = $("#chatbox")[0].scrollHeight - 20; //Scroll height after the request if(newscrollHeight > oldscrollHeight){ $("#chatbox").animate({ scrollTop: newscrollHeight }, 'normal'); //Autoscroll to bottom of div } } }); } setInterval (loadLog, 2500); $("#exit").click(function () { var exit = confirm("Are you sure you want to end the session?"); if (exit == true) { window.location = "index.php?logout=true"; } }); }); </script> </body></html><?php}?> |
Here is the code for post.php:
1 2 3 4 5 6 7 8 9 | <?phpsession_start();if(isset($_SESSION['name'])){ $text = $_POST['text']; $text_message = "<div class='msgln'><span class='chat-time'>".date("g:i A")."</span> <b class='user-name'>".$_SESSION['name']."</b> ".stripslashes(htmlspecialchars($text))."<br></div>"; file_put_contents("log.html", $text_message, FILE_APPEND | LOCK_EX);}?> |
The code that goes into style.css is already available in Step 2 of the tutorial.
If the code you have does not seem to be working, make sure it matches the code provided here. Please note that all three files—index.php, post.php, and style.css—are located in the same directory.
Awesome Online Chat PHP Scripts From CodeCanyon
Would you rather download an online chat PHP script instead of creating one yourself? Then you'll want to check out these premium templates from CodeCanyon:
1. Live Chat Unlimited
Live Chat Unlimited is a bestselling simple PHP chat box for a reason. It's very lightweight to keep your site load speeds down and can be installed on unlimited domains. The online chat PHP script also offers multi-lingual support through the WPML and Polylang plugins. You can also enable email notifications so you can be ready to chat with visitors.

2. TotalDesk: Helpdesk, Live Chat, Knowledge Base and Ticket System
TotalDesk is a complete help desk solution for your business. Not only does it let you make your own chat box, but it also includes a ticket and notification system, among other things. You can create a searchable knowledge base for your site's visitors, so they can solve common problems on their own. TotalDesk also integrates well with WooCommerce and Slack.

3. XeroChat: Facebook Chatbot, eCommerce and Social Media Management Tool
If Facebook Messenger is part of your business's marketing strategy, you'll want to learn about XeroChat. It's designed with the messaging platform in mind and integrates well with it. This online chat PHP script lets you build responsive and interactive chatbots with ease. It's so fully featured that you can even set up eCommerce stores with the included code. Add XeroChat to your online business strategies.

4. Chat Support Board: PHP Chat Application
Finally, there's Support Board, a PHP chat script that uses artificial intelligence to help serve your customers. Communicate directly with your audience with ease thanks to its smooth integration with other platforms. You'll save time and increase engagement with this simple PHP chat box.


0 Comments